The aim of this tutorial is to show how to integrate Firebase Analytics on a Ionic/Angular Native App, to start using the all in one (Web + App) Analytics tool.
It’s a first post of a serie about Firebase Analytics, in which we pretend to cover following topics:
- Add Firebase Analytics support on native apps.
- Add Firebase Analytics support on web app.
- include a “switch” service to inject native or web service.
- Extend witch cloud function.
- Export Firebase Analytics data to BigQuery for detailed analyse.
Repository & demo
All source code can be found on GitHub: https://github.com/meumobi/mmb-demos.firebase-analytics-ionic
What you’ll need
Dev tools
We need to have Node.js and Git installed in order to install both Ionic and Cordova.
$ npm install cordova @ionic/cli typescript -g
...
$ npm ls -g cordova @ionic/cli npm typescript --depth 0
/Users/vdias/.nvm/versions/node/v12.11.0/lib
├── @ionic/cli@6.1.0
├── cordova@9.0.0
├── npm@6.13.6
├── phonegap@9.0.0
└── typescript@3.7.5
Firebase account
If you don’t have a Firebase account and project setup yet, the first thing we’ll need to do is to create a Firebase account and then create a Firebase project. Both are free.
What you’ll build
To explore Analytics capabilities we’ll use the conference starter (“A kitchen-sink application that shows off all Ionic has to offer”). It contains out-of-the-box a lot of useful pages to illustrate following features:
- Log Events
- Set User Properties
- Track Screens
- Set a User ID
There’s no difference between iOS and Android in terms of implementation, then we’ll focus on this tutorial on Android, because it’s easier to build and test. But if you use these instructions on iOS App should works fine too.
Implementation path
- Create a Ionic/Angular project
- Install cordova-plugin-firebasex
- Connect apps to Firebase
- download
google-services.jsonandGoogleService-info.plist
- download
- Create AnalyticsService
- Test Firebase Analytics capabilities
- Log Events
- Set User Properties
- Track Screens
- Set a User ID
Create a project
$ ionic start mmb-demos.firebase-analytics-ionic conference
$ cd ./mmb-demos.firebase-analytics-ionic
Then open the config.xml and update the widget@id with your own. We’ll use this id later to register the app on firebase.
Run & deploy the application
Prepare platform
$ ionic cordova prepare android
> cordova platform add android --save
...
> ng run app:ionic-cordova-build --platform=android
...
> cordova prepare android
...
You only need to run prepare platform the 1st time, for next builds only run app as described below.
Run App
$ ionic cordova run android
> ng run app:ionic-cordova-build --platform=android
...
> cordova build android --device
...
> native-run android --app platforms/android/app/build/outputs/apk/debug/app-debug.apk --device
...
Add Cordova plugin to support Firebase Analytics
Install cordova-plugin-firebasex and its @ionic-native wrapper
Install cordova-plugin-firebasex and the Firebase-X Ionic native wrapper (@ionic-native/firebase-x).
$ cordova plugin add cordova-plugin-firebasex
$ npm install @ionic-native/firebase-x --save
Register the plugin in an NgModule as a provider
Register the plugin in an NgModule as a provider, for example on src/app/app.module.ts:
import { SplashScreen } from '@ionic-native/splash-screen/ngx';
import { StatusBar } from '@ionic-native/status-bar/ngx';
import { FirebaseX } from '@ionic-native/firebase-x/ngx';

@NgModule({
...
  providers: [
    InAppBrowser,
    SplashScreen,
    StatusBar,
    FirebaseX,
  ],
...
})

export class AppModule {}
Connect the app to Firebase
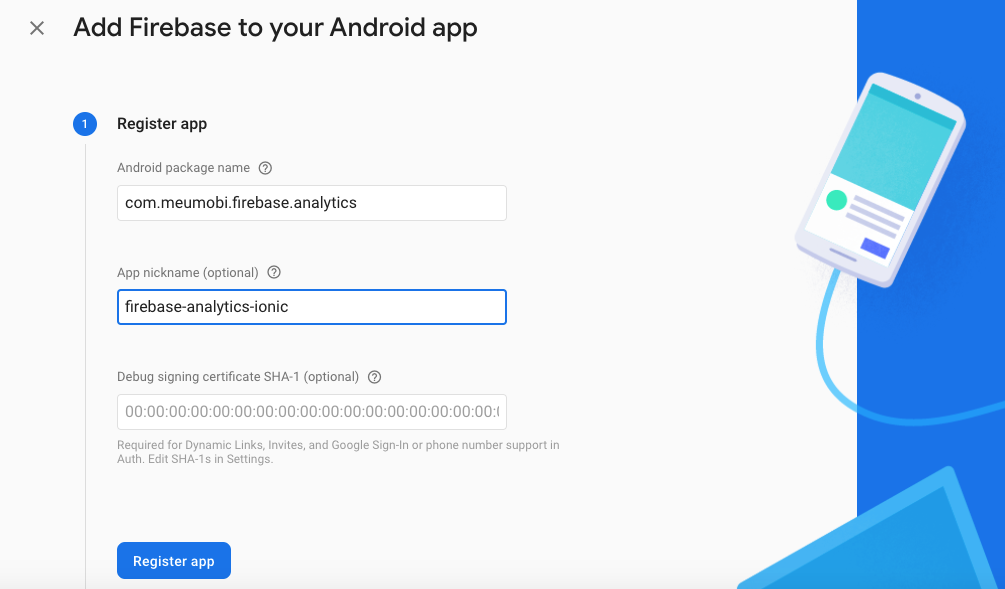
Register Android and/or iOS Apps on firebase and download resp. google-services.json and GoogleService-info.plist, save them on root of project.
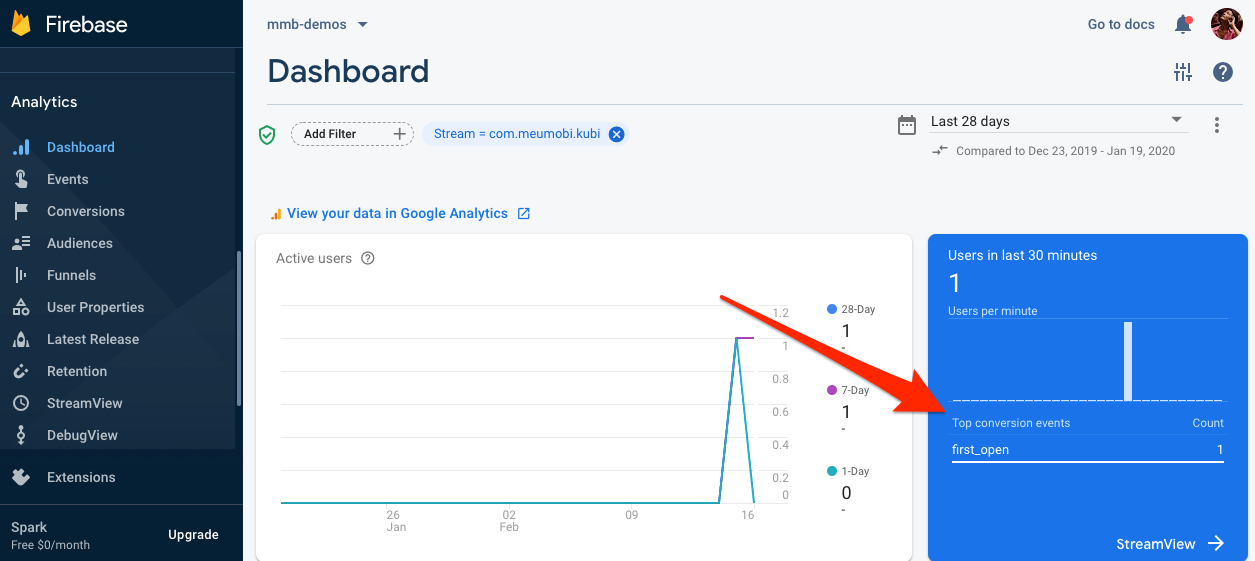
At this stage if you run the app on device you should track on Firebase Console > Analytics Dashboard an auto collected event ‘first_open’ as shown below.
Create AnalyticsService
Following firebase-x analytics API we’ll create a service with the 4 main methods we’ll use on our app:
$ ionic g service core/analytics/analytics
import { FirebaseX } from '@ionic-native/firebase-x/ngx';
import { Injectable } from '@angular/core';
import { Platform } from '@ionic/angular';

@Injectable({
  providedIn: 'root'
})
export class AnalyticsService {

  constructor (
    private firebaseX: FirebaseX,
    private platform: Platform
  ) {}

    // Tracks a custom event in Firebase Analytics
    logEvent(name: string, properties: object) {
      this.platform.ready().then(() => {
        this.firebaseX.logEvent(name, properties); // Ex: "select_content", {content_type: "page_view", item_id: "home"}
      });
    }

    setUserProperty(key: string, value: string) {
      this.platform.ready().then(() => {
        this.firebaseX.setUserProperty(key, value);
      });
    }

    // Tracks an 'screen_view' event in Firebase Analytics
    trackScreen(name: string) {
      this.platform.ready().then(() => {
        this.firebaseX.setScreenName(name);
      });
    }

    setUserId(uid: string) {
      this.platform.ready().then(() => {
        this.firebaseX.setUserId(uid);
      });
    }
}
Log Events
Introduction
Events provide insight on what is happening in your app, such as user actions, system events, or errors.
Use case: share speaker contact
After you have implemented the AnalyticsService, you can begin to log events with the logEvent() method.
For example we can log when a user share a speaker contact, calling Logevent on pages/speaker-list/speaker-list.ts:
import { AnalyticsService } from '../../core/analytics/analytics.service';
...
  constructor(
...
    private analyticsService: AnalyticsService
  ) {}

text: 'Share via ...',
handler: () => {
  this.analyticsService.logEvent('share', { content_type: 'speaker', id: speaker.id });
}
Automatically collected events
Analytics automatically logs some events for you; you don’t need to add any code to receive them, for example:
| Event | Trigger | Parameters |
|---|---|---|
| app_exception | when the app crashes or throws an exception | fatal, timestamp |
| app_update | when the app is updated to a new version and launched again | previous_app_version |
| first_open | the first time a user launches an app after installing or re-installing it | previoius_gmp_app_id, updated_with_analytics, previous_first_open_count, system_app, system_app_update, deferred_analytics_collection, reset_analytics_cause |
| notification_open | when a user opens a notification sent by FCM. | message_name, message_time, message_device_time, message_id, topic, label, message_channel |
| user_engagement (app, web) | periodically, while the app is in the foreground | engagement_time_msec |
Suggested events and prescribed parameters
To help you get started, the Analytics SDK defines a number of suggested events that are common among different types of apps. To get the maximum detail in reports, log the suggested events that make sense for your app and their prescribed parameters. For example:
| Event | Trigger | Parameters |
|---|---|---|
| share | when a user has shared content | content_type, item_id |
| login | when a user logs in | method |
| tutorial_begin | when a user begins a tutorial | No parameters |
| tutorial_complete | when a user completes a tutorila | No parameters |
Custom parameters and value
In addition to the prescribed parameters, you can add the following parameters to any event:
- Custom parameters
- value parameter: value is a general purpose parameter that is useful for accumulating a key metric that pertains to an event. Examples include revenue, distance, time, and points.
Custom events
If your application has specific needs not covered by a suggested event type, you can log your own custom events.
Set User Properties
Introduction
User properties are attributes you define to describe segments of your user base, such as language preference or geographic location. These can be used to define audiences for your app.
Use case: set has_profile_picture property
We can imagine a campaign of push notification to call users to upload a profile_picture. To achieve it we need to log when a user login if he has a profile picture setted on his profile, and setUserProperty on src/app/providers/user-data.ts:
  login(username: string): Promise<any> {
    return this.storage.set(this.HAS_LOGGED_IN, true).then(() => {
      this.setUsername(username);
      this.analyticsService.setUserProperty('has_profile_picture', 'false');
      return window.dispatchEvent(new CustomEvent('user:login'));
    });
  }
OBS: FirebaseAnalytics.setUserProperty only accepts string as value, it’s why we’ve converted the boolean to string on example above.
Automatically collected user properties
Analytics automatically logs some user properties; you don’t need to add any code to enable them. If you need to collect additional data, you can set up to 25 different Analytics User Properties per project.
You can’t use a small set of user property names reserved by Google: Age, Gender, Interest.
The “firebase_”, “google_” and “ga_” prefixes are reserved and should not be used for user property names.
The value of the user property. Values can be up to 36 characters long. Setting the value to null removes the user property.
Source: FirebaseAnalytics: setUserProperty
When the Device Advertising ID is not present, Analytics cannot derive demographics and interests information. Consequently, demographics and interests data may only be available for a subset of your users, and may not represent the overall composition of your traffic.
Analytics derives demographics and interests data from Android Advertising ID, iOS Identifier for Advertisers (IDFA). Location data is derived from users’ IP addresses.
Data thresholds
Thresholds are applied to prevent anyone viewing a report from inferring the demographics, interests, or location of individual users. When a report contains Age, Gender, Interests, or Location, a threshold may be applied and some data may be withheld from the report. For example, if there are fewer than N instances of Gender=male in a report, then data for the male value may be withheld.
Source: Automatically collected user properties
So during your tests or at the begining of Analytics integration some data may be withheld, and you should not be surprised if your reports not reflect exactly what you expect.
Track Screens
Introduction
Google Analytics tracks screen transitions and attaches information about the current screen to events, enabling you to track metrics such as user engagement or user behavior per screen. Much of this data collection happens automatically, but you can also manually track screen names.
Because Ionic apps are Single Page Applications (SPAs) running in a WebView, the concept of a screen view happens when a new Component loads and is displayed to the user on the screen.
Thanks to Lifecycle Hooks in Angular we can hook into the moment a Component is initialized with the ngOnInit lifecycle hook and set the screen name with the Firebase Analytics Ionic native wrapper to instruct Firebase to track the screen_view event. Also all the future events tracked in this component will have the context of this screen to help identify where does the users use the app more.
When you use firebaseAnalytics.trackScreen(screenName), besides from tracking a screen_view event, that screenName will be used as the firebase_screen parameter for all the future events tracked, so it’s important to always set the current screen for every component.
Use case: Track speaker-list and speaker-detail
We can track speaker-list and speaker-detail pages as show below:
src/app/pages/speaker-list/speaker-list.ts
  ionViewDidEnter() {
    this.confData.getSpeakers().subscribe((speakers: any[]) => {
      this.speakers = speakers;
    });
    this.analyticsService.trackScreen('SpeakerList');
  }
src/app/pages/speaker-detail/speaker-detail.ts
  ionViewWillEnter() {
    this.dataProvider.load().subscribe((data: any) => {
      const speakerId = this.route.snapshot.paramMap.get('speakerId');
      if (data && data.speakers) {
        for (const speaker of data.speakers) {
          if (speaker && speaker.id === speakerId) {
            this.speaker = speaker;
            this.analyticsService.trackScreen(`SpeakerDetail: ${speaker.name}`);
            break;
          }
        }
      }
    });
  }
Manually track screens
You can manually set the screen name and optionally override the class name when screen transitions occur. After setting the screen name, events that occur on these screens are additionally tagged with the parameter firebase_screen.
Set a User ID
Introduction
Google Analytics has a setUserID call, which allows you to store a user ID for the individual using your app. This call is optional, and is generally used by organizations that want to use Analytics in conjunction with BigQuery to associate analytics data for the same user across multiple apps, multiple devices, or multiple analytics providers.
Use case: Set a UserId on login
To track user on iOS and Android Apps you should set a UserId. This id should be provided/saved on your backend to share it across all Apps which user could log in.
Then on src/app/providers/user-data.ts:
  login(username: string): Promise<any> {
    return this.storage.set(this.HAS_LOGGED_IN, true).then(() => {
      this.setUsername(username);
      this.analyticsService.setUserProperty('has_profile_picture', 'false');
      this.analyticsService.setUserId('123');
      return window.dispatchEvent(new CustomEvent('user:login'));
    });
  }
Avoid personally identifiable information
Your user ID must not contain information that a third party could use to determine the identity of an individual user. For example, you cannot use a user’s email address or social security number as a user ID.
user_pseudo_id
Setting a user ID is never required for Analytics to work correctly. If you’re only interested in finding events belonging to the same user for the same app on a single device, you can use the
user_pseudo_id. This value is generated automatically by Analytics and is stored within BigQuery for each event.
Debugging in Firebase
DebugView
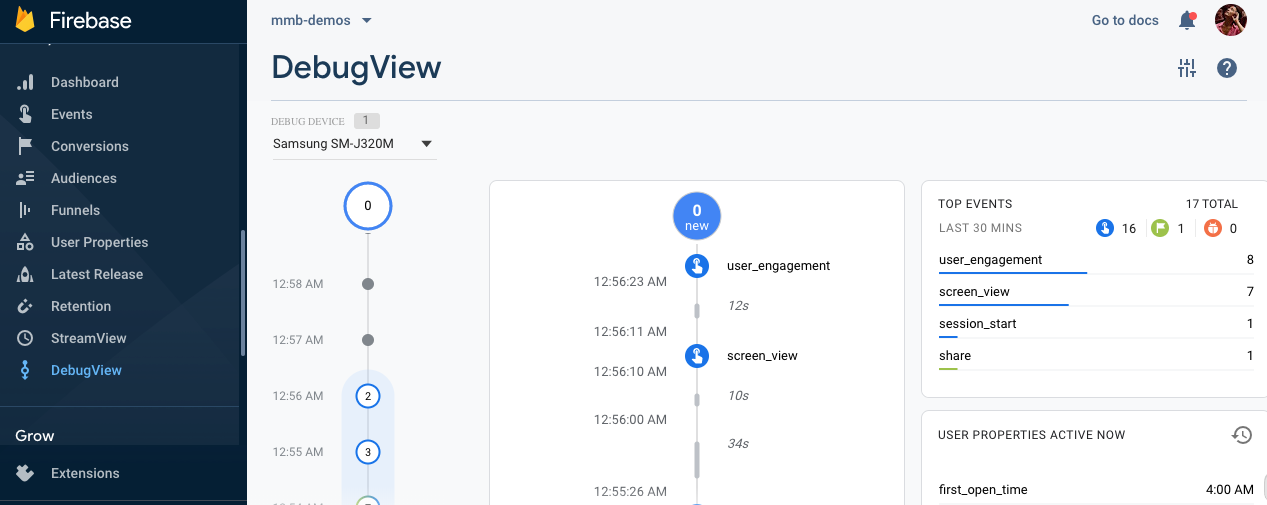
Generally, events logged by your app are batched together over the period of approximately one hour and uploaded together. This approach conserves the battery on end users’ devices and reduces network data usage. However, for the purposes of validating your analytics implementation (and, in order to view your analytics in the DebugView report), you can enable Debug mode on your development device to upload events with a minimal delay.
Means you can enable debug mode on your app build and follow on Firebase console > DebugView on “real-time like” events tracked. This feature is very useful and easy to setup, don’t miss it.
Enable debug mode on your device
To use DebugView, you must first enable Debug mode on your device:
Android
To enable Analytics Debug mode on an emulated Android device, execute the following command line:
adb shell setprop debug.firebase.analytics.app <package_name>
This behavior persists until you explicitly disable Debug mode by executing the following command line:
adb shell setprop debug.firebase.analytics.app .none.
iOS
To enable Analytics Debug mode on your development device, specify the following command line argument in Xcode :
-FIRDebugEnabled
This behavior persists until you explicitly disable Debug mode by specifying the following command line argument:
-FIRDebugDisabled
Hope this article helps you, any update or feedback for this post please leave it in the comments.
Furthermore
