This post continues our serie on Ionic 4/Angular + Firebase Stack, as always we use AngularFire to connect our client App to Firebase SDK. There are a lot of posts about this topic but few up-to-date using AngularFire, and it’s the main motivation of this post because it exists discussions about using or not AngularFire.
workaround for using FCM with ngsw
On AngularFire documentation you’ll read an explicit advice to not use AngularFireMessaging with Angular Service Worker (aka @angular/pwa)
AngularFireMessaging is not compatible with the Angular Service Worker
Despite this alert we’ve found a lot of examples (Jeff Delaney: Push Notifications with Ionic4 and Firebase Cloud Messaging, Ionicthemes: Adding Push Notifications to our Ionic PWA) of use of both technologies together, all of theses examples are using a workaround that was debated on github/@angularfire thread. Feedbacks and our own experience are positives, then this is this workaround we’ll follow on this post.
Repository & demo
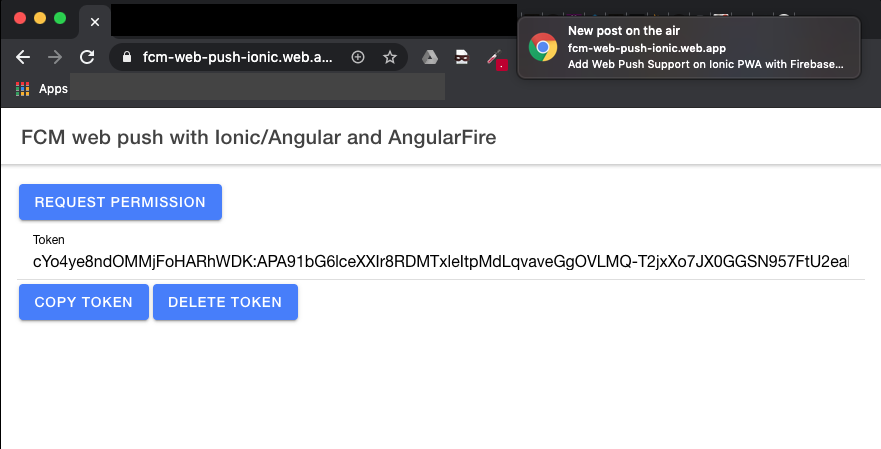
Demo app is deployed on fcm-web-push-ionic.web.app
All source code can be found on GitHub: https://github.com/meumobi/mmb-demos.fcm-web-push-ionic
What you’ll build
We are going to create a demo to show basic behaviors/actions related to web push.
- Request permission
- Get token
- Send push
We’ll use Ionic for UI with Angular, Firebase Cloud Messaging as cross-platform messaging solution and AngularFireMessaging, the official Angular library for Firebase.
What you’ll need
We need to have Node.js and Git installed in order to install Ionic.
And of course you’ll also need a Firebase account.
Methodology
Each main section below corresponds to a visible milestone of the project, where you can validate work on progress running App.
- Create a project
- Run & deploy the application
- Add Firebase to your Ionic/Angular project
- Make Ionic 4/Angular app a PWA
- Add FCM Service worker
- Adding Push config to the Web Manifest
- Requesting Permission
By this way you can pickup what is interesting for you and/or run tutorial on several days always keeping a stable state of project, avoid big bang ;-)
Create a project
Prerequisites
$ npm install ionic typescript @angular/cli -g
...

$ npm ls -g ionic npm typescript @angular/cli --depth 0
/Users/victor.dias/.nvm/versions/node/v12.6.0/lib
├── @angular/cli@8.3.17
├── ionic@5.4.13
├── npm@6.11.3
└── typescript@3.7.2
Create a new Ionic v4 PWA
Create a New Ionic/Angular Application with
$ ionic start mmb-demos.fcm-web-push-ionic blank --type=angular
$ cd ./mmb-demos.firebase-web-push-ionic
$ ng add @angular/pwa
That means:
ionic startcreates the app.mmb-demos.fcm-web-push-ionicis the name we gave it.blanktells the Ionic CLI the template you want to start with. You can list available templates using ionic start –list--type=<angular>type of project to start (e.g. angular, react, ionic-angular, ionic1)
The command ionic start will initialize a git repository and run npm install to get all the packages into node_modules.
Run & deploy the application
Run your app on web browser
You can test the App running ionic serve cmd:
$ ionic serve
Add Firebase to your project
Create a Firebase project
Register your app with Firebase
Register your app with Firebase
Add Firebase SDKs and initialize Firebase
The official AngularFire library has many modules to help us interact with the different Firebase features, it includes FCM (Firebase Cloud Messaging) through AngularFireMessaging.
$ npm install @angular/fire firebase --save
Copy your firebase config (get from firebase console) to
src/environments/environment.ts
export const environment = {
  production: false,
  firebase: {
    apiKey: '<your-key>',
    authDomain: '<your-project-authdomain>',
    databaseURL: '<your-database-URL>',
    projectId: '<your-project-id>',
    storageBucket: '<your-storage-bucket>',
    messagingSenderId: '<your-messaging-sender-id>'
    appId: '<your-app-id>',
    measurementId: '<your-measurement-id>'
  }
};
And Import it on App Module with required AngularFire modules. src/app/app.module.ts
import { AngularFireModule } from '@angular/fire';
import { environment } from '../environments/environment';
import { AngularFireMessagingModule } from '@angular/fire/messaging';
...

@NgModule({
  imports: [
    ...
    AngularFireModule.initializeApp(environment.firebase),
    AngularFireMessagingModule
  ],
  ...
})
export class AppModule {}
Make Ionic/Angular app a PWA
The two main requirements of a PWA are a Service Worker and a Web Manifest. While it’s possible to add both of these to an app manually, the Angular team has an @angular/pwa package that can be used to automate this.
The @angular/pwa package will automatically add a service worker and an app manifest to the app. To add this package to the app, run:
$ ng add @angular/pwa
Once this package has been added run ionic build --prod and the www directory will be ready to deploy as a PWA.
Add FCM Service worker
firebase-messaging SW
The messaging service requires a firebase-messaging-sw.js file. Create an empty file with that name and place it in the root of your domain, ie. src/firebase-messaging-sw.js.
importScripts('https://www.gstatic.com/firebasejs/7.4.0/firebase-app.js');
importScripts('https://www.gstatic.com/firebasejs/7.4.0/firebase-messaging.js');

firebase.initializeApp({
  apiKey: 'AIzaSyA5Xvv-O_G531RILC50FlRBSWr-HVzlEJA',
  projectId: 'meu-starter',
  messagingSenderId: '581248963506',
  appId: '1:581248963506:web:9f09b416b6fbf3a8ee4aab',
});

const messaging = firebase.messaging();
The versions of firebase on imports should be the same of used on your ng project (see package.json).
Combine fb messaging and ng SWs
Here is the workaround to allow AngularFire to work with @angular/pwa.
Open and edit src/combined-sw.js
importScripts('ngsw-worker.js');
importScripts('firebase-messaging-sw.js');
And update angular.json to copy these new files on build, add following lines on build/options/assets:
"src/combined-sw.js",
"src/firebase-messaging-sw.js"
Register combined-sw on app.module
On src/app/appp.module.ts replace
ServiceWorkerModule.register('ngsw-worker.js', { enabled: environment.production })
by
ServiceWorkerModule.register('combined-sw.js', { enabled: environment.production })
Adding Push config to the Web Manifest
We need to add this arbitrary string to your manifest.webmanifest: "gcm_sender_id": "103953800507". This value is the same for every single apps in the world, it identifies Google FCM as sender of the notifications.
Configure Web Credentials with FCM
The FCM Web interface uses Web credentials called “Voluntary Application Server Identification,” or VAPID keys, to authorize send requests to supported web push services. To tell your application to subscribe to the notifications, you will need to associate such a key with your project. Find VAPID Key on Firebase console:Project Settings/Cloud Messaging. I didn’t find how/where to do such association, and works fine without, if you have some insights to share about, please leave a comment, I’ll be glad to update this section.
Requesting Permission
Once you have the Firebase Messaging Service Worker setup and installed, you need to request permission to send a user notifications.
You can do it wherever/whenever you want, on this demo we’ll do it on src/app/home/home.page.ts
export class HomePage {

  constructor(
    private afMessaging: AngularFireMessaging
  ) { }

  requestPermission() {
    this.afMessaging.requestToken
      .subscribe(
      (token) => { console.log(token); },
      (error) => { console.error(error); }
    );
  }
...
}
OBS: Since firebase v7.6.0 getToken() automatically requests notification permission if permission was set to “default”.
Sending push notifications
Firebase console
Now you are ready to send a notification to test. Remember that the Firebase Messaging Service Worker handles background push notifications, means when your website is not open on active tab of browser.
Go to Firebase console: Messaging, click on “New Notification”, et voila!.
Postman
You can also use Postman to send notification through fcm API, I recommend this way if you want to need more options for customizations.
How to test
If you want to do several tests, you would like to toggle allow/block notifications, you can achieve it looking for notifications on chrome settings (usually on Site Settings). Look for the url you are tested and change permissions as you prefer.
Firebase SDK issue: ‘token-unsubscribe-failed’
If during your tests you face following error message on your logs, it’s due to a Firebase SDK issue, I temporary recommend this workaround shared on github.
A problem occured while unsubscribing the user from FCM: FirebaseError: Messaging: A problem occured while unsubscribing the user from FCM: Internal error encountered. (messaging/token-unsubscribe-failed).
Furthermore
